Quickstart
Overview
This guide explains how to organise payment processing via the Gate API of the Openpayze payment platform. This integration mode implies that you use your in-house user interface to ensure maximum interaction with customers on the side of the web service while the interaction with the payment platform is carried out on the programmatic level, “under the hood” so to speak. It allows you to apply tested and quick solutions as you follow the instructions and use code samples in PHP and Go.
With this guide, you will learn how to accept one-step purchases (which are the most frequently used payments).
If you need Gate only for checking statuses of individual payments, use this guide to learn how to work with signatures and see Checking current payment information. If you feel like you need something completely different, consider the following options.
- If you need to set up payment solutions with the use of Payment Page developed by Openpayze for processing payments via websites, go to Payment Page and Integration using SDK.
- If you need to set up payment link purchases that utilise Payment Page, use this guide to learn how to work with signatures, responses, and callbacks and then go to Payment link purchase. You can also initiate payment link purchases manually via Dashboard, the interface for the merchant's employees.
- If you need to set up retrieving operation and balance information via an API, go to Using Data API.
- Finally, if what you need has not been covered above, browse other sections of the documentation and contact the Openpayze specialists.
Now that the introductory matters have been taken care of, let's get to work.
Brief theory
Projects and keys
Working with the payment platform can be compared to using hotel services: to check into a hotel, you need a room and a key for this room, and to start working with the platform, you need a project and a key for this project. And like in case of hotel rooms, there can be a different number of projects for one client—for different aims and purposes—and each project requires its own key.
Usually, to work with the platform, having one test and one production project is enough. This case is typical and is used as the basis within the Quickstart guide. If for any reason you need more projects, make sure to identify this need in the communication with your account manager. In the meantime, you don't have to wait till this issue gets resolved: you can already start working on the implementation and setup with one test project.
If you have already obtained the identifier (project_id) and the secret key (secret_key) of the test project, have them at hand as you proceed with the implementation.
To start working with the platform, you need a project and a key for this project. If you have already obtained the identifier (project_id) and the secret key (secret_key) of the test project, have them at hand as you proceed with the implementation.
Workflow
To ensure payments are processed via Gate correctly, you need to set up collecting relevant parameters, forming and sending requests to the payment platform as well as accepting and processing information sent in responses from the payment platform. Along with that, all interaction with customers (necessary for collecting and displaying relevant information) should be carried out on the side of the web service with the use of your own in-house solutions, while all other procedures (to process the information) can be implemented with the use of the code samples presented below.
Let's have a look at the workflow of processing a purchase with the focus on the technical aspects for the web service and the payment platform.
| Web service | Payment platform | |
|---|---|---|
| 1 | Collects all necessary data when the customer is ready to pay for their order, combines payment parameters into a payload of the request and signs it, creates a payment request and sends it to the payment platform. | – |
| 2 | Informs the customer that the payment is being processed. | Accepts the request and works on it to execute the payment. If applicable, sends a callback prescribing necessary actions. |
| 3 | If applicable, accepts the callback prescribing necessary actions, performs these actions (with or without the customer's involvement) and sends the request for resuming payment processing to the payment platform. | – |
| 4 | Informs the customer that the payment is being processed. | If applicable, accepts the additional request and performs actions necessary to resume the payment processing. Sends a callback with the payment result to the web service. |
| 5 | Accepts the payment result callback and displays relevant information to the customer. | – |
When you work with other payment types, the actions can somewhat differ; however, the overall workflow remains the same. Modes of its implementation on the side of the web service can vary. In this guide, we cover basic procedures that can be used and adapted to the specifics of your web service.
Request parameters
The set of parameters required for executing a payment can vary depending on the type of this payment, the specifics of the utilised payment method and the payment system, regional characteristics and other aspects. Thus, sometimes you may need to provide the payment description, the customer's address, or other details, and sometimes such data may not be required. This is why when you set up processing of different payment types and payment methods, refer to the documentation and the Gate API specification for particular details.
The set of parameters required for executing a payment can vary depending on different aspects. This is why when you set up processing of different payment types and payment methods, refer to the documentation and the Gate API specification for particular details.
To process a basic purchase with the Open Banking method, you need to specify the following parameters:
| Parameter | Description |
|---|---|
general—object containing general request identification information |
|
|
|
Project identifier. Together with the key, it is provided by Openpayze and should be accurately specified even in test requests. If not, the payment platform will react accordingly: think of it as trying to enter someone else's hotel room with your key. received from Openpayze. |
|
|
Payment identifier. It can have random values but should always be unique within the project used. Otherwise, an error will occur generated on the side of the web service. |
|
|
Request signature. It is generated according to the specialised algorithm described below. Use the test key for sending test requests and use the production secret key for processing live payments generated as described below. |
payment—object containing general payment information |
|
|
|
Payment amount. In test requests it can be a random amount while in real ones the amount should correspond to the amount of the order. The amount is, specified in minor currency units. |
|
|
Payment currency code. It is specified in the three-letter ISO 4217 alpha-3 format. Test requests can contain any of the existing codes while every real request should contain the code of the currency in which the payment is being initiated. |
customer—object containing general customer information |
|
|
|
Customer identifier in the web service. It can have random values and be reused in different requests; however, the identifier of every real customer should exactly match the account of this very customer in the web service and be unique within the project. |
ip_address |
IP address of the customer. In test requests you can provide your own IP address while in real requests you must specify an actual IP address where the customer initiates the payment. |
account — object containing the customer's bank account details |
|
|
|
Bank identifier |
The request payload with these parameters may look like the following:
{
  "general": {
      "project_id": 42,
      "payment_id": "Cosmoshop_purchase_2025-01-01_000001",
      "signature": "rdCiqlibt8SUMe3OVPNfKMYnQjQ6dkEvRQhMkJRg9ZJULdsKJEZU21E5Y/ISdv0FtXi3oJE5n4hSNK3Owo7Axw=="
  },
    "customer": {
      "ip_address": "248.121.176.220",
      "id": "17008"
  },
    "payment": {
      "amount": 8855,
      "currency": "USD"
  },

    "account": {
      "bank_id": 54981
  }
}
You may also need to use other parameters when processing payments:
- Parameters necessary due to specific characteristics of payment systems and regional differences. If these parameters were not passed in the initial request, the payment may be declined or you may need to specify them while the payment is being processed.
- Parameters necessary due to specific characteristics of the web service operation, for example, when you need to send the payment result notification to the customer. If such parameters are not provided, these capabilities may not be supported.
To ensure proper handling of these parameters, you may require to set up additional procedures. They are partially described below and fully covered in Additional aspects. Refer to this section of the article once you configured and tested all basic procedures.
Overall, collection of necessary parameters can be set up at your convenience, with regard to your web service's architecture and other aspects (for examples, relevant dictionaries and databases). Now that the required parameters have been covered, let's get to implementation.
Basic implementation
Overview
Implementing payment processing with the use of your web service functionality can be carried out in various ways, which includes creating your own software solutions. This guide describes the implementation procedure with the use of the ready-made code from Openpayze to sign data, send requests, accept responses to these requests as well as callbacks and with the use of your solutions on the side of the web service for performing other actions, which includes collecting customer information and notifying customers about payment results.
Data signing
When all required parameters have been specified, you can generate a signature for them and create a request.
*/
class Signer
{
    const ITEMS_DELIMITER = ';';
    const ALGORITHM = 'sha512';
    const IGNORED_KEYS = ['frame_mode'];

    /**
     * Secret key
     *
     * @var string
     */
    private $secretKey;

    /**
     * __construct
     *
     * @param string $secretKey
     */
    public function __construct(string $secretKey)
    {
        $this->secretKey = $secretKey;
    }

    /**
     * Check signature
     *
     * @param array $params
     * @param string $signature
     * @return boolean
     */
    public function check(array $params, string $signature): bool
    {
        return $this->sign($params) === $signature;
    }

    /**
     * Return signature
     *
     * @param array $params
     * @return string
     */
    public function sign(array $params): string
    {
        $stringToSign = implode(self::ITEMS_DELIMITER, $this->getParamsToSign($params, self::IGNORED_KEYS));
        return base64_encode(hash_hmac(self::ALGORITHM, $stringToSign, $this->secretKey, true));
    }

    /**
     * Get parameters to sign
     *
     * @param array $params
     * @param array $ignoreParamKeys
     * @param string $prefix
     * @param bool $sort
     * @return array
     */
    private function getParamsToSign(
        array $params,
        array $ignoreParamKeys = [],
        string $prefix = '',
        bool $sort = true
    ): array {
        $projectId = 42;
        $paymentId = '12345';
        $customerId = '123';
        $ip = '192.168.1.1';
        $paymentAmount = '1000';
        $paymentCurrency = 'USD';

        $bankId = '54981';


        $paramsToSign = [
            'general'  => [
            'project_id' => $projectId,
            'payment_id' => $paymentId,
            ],
            'customer'  => [
            'id' => $customerId,
            'ip_address' => $ip,
            ],
            'payment'  => [
            'payment_amount' => $paymentAmount,
            'payment_currency' => $paymentCurrency,
            ],

            'account'  => [
            'bank_id' => $bankId
            ],
        ];

        foreach ($params as $key => $value) {
            if (in_array($key, $ignoreParamKeys, true)) {
                continue;
            }

            $paramKey = ($prefix ? $prefix . ':' : '') . $key;
            if (is_array($value)) {
                $subArray = $this->getParamsToSign($value, $ignoreParamKeys, $paramKey, false);
                $paramsToSign = array_merge($paramsToSign, $subArray);
            } else {
                if (is_bool($value)) {
                    $value = $value ? '1' : '0';
                } else {
                    $value = (string)$value;
                }

                $paramsToSign[$paramKey] = $paramKey . ':' . $value;
            }
        }

        if ($sort) {
            ksort($paramsToSign, SORT_NATURAL);
        }

        return $paramsToSign;
    }
}
package main

import (
	"crypto/hmac"
	"crypto/sha512"
	"encoding/base64"
	"sort"
)

const itemsDelimiter = ";"

var ignoredKeys = map[string]struct{}{"frame_mode": struct{}{}}

var secretKey string

func SetSecretKey(key string) {
	secretKey = key
}

func Check(params map[string]map[string]string, signature string) bool {
	return Sign(params) == signature
}

func Sign(params map[string]map[string]string) string {
	var stringToSign string

	paramsToSign := getParamsToSign(params, ignoredKeys, "", true)
	for _, value := range paramsToSign {
		for _, v := range value {
			stringToSign = stringToSign + itemsDelimiter + v
		}
	}

	mac := hmac.New(sha512.New, []byte(secretKey))
	mac.Write([]byte(stringToSign))

	return base64.StdEncoding.EncodeToString(mac.Sum(nil))
}

func getParamsToSign(params map[string]map[string]string, ignoreParamKeys map[string]struct{},
	prefix string, sorted bool) map[string]map[string]string {
	var paymentId, customerId, ip, amount, currency, cardPan, cardYear, cardMonth, cardHolder, cardCvv string

	paramsToSign := map[string]map[string]string{
		"general": {
			"project_id": projectId,
			"payment_id": paymentId,
		},
		"customer": {
			"id":         customerId,
			"ip_address": ip,
		},
		"payment": {
			"payment_amount":   amount,
			"payment_currency": currency,
		},

		"account": {
			"bank_id":   bankId
		},
	}

	for key, value := range params {
		for k, v := range value {
			if _, ok := ignoreParamKeys[k]; ok {
				continue
			}

			paramKey := k
			if prefix != "" {
				paramKey = prefix + ":" + k
			}

			paramsToSign[key][paramKey] = paramKey + ":" + v
		}
	}

	if sorted == true {
		return sortParams(paramsToSign)
	}

	return paramsToSign
}

func sortParams(params map[string]map[string]string) map[string]map[string]string {
	var sortedParams map[string]map[string]string
	keys := make([]string, 0, len(params))

	for kp := range params {
		keys = append(keys, kp)
	}
	sort.Strings(keys)

	for _, ks := range keys {
		sortedParams[ks] = params[ks]
	}

	return sortedParams
}
Sending requests and accepting responses
When all data is collected and signed, you can send the request to the required endpoint (the list of endpoints can be found in the Gate API). In our case, it is the /v2/payment/banks/{payment_method}/sale endpoint. When the request is received (as a rule, within 100 ms), the payment platform sends a synchronous HTTP response to the web service stating either that the request was accepted for processing or that the request was not accepted due to detected errors.
The following codes are used in the responses from the platform:
200 OK—the request has been accepted for processing. In this case, expect subsequent callbacks about processing of the payment. The next section describes how to work with such callbacks.400 Bad Request—the request has not been accepted because at least one required parameter is missing or the signature is invalid. In this case, add missing data and generate a new signature (or generate a signature again after you have checked the validity of the project ID and the key) and resend the request.403 Forbidden—the request has not been accepted due to lack of permissions to access the endpoint. In this case, contact the Openpayze technical support to have the sender's IP address added to the IP whitelist.422 Unprocessable Entity—the request has not been accepted because it contains a syntax error (for example, a comma is missing). In this case, correct the mistake and resend the request.500 Internal Error—the request has not been accepted because the payment platform was unavailable. In this case, try resending the request later.
If you need information contained in the responses from the platform, set up their reception and processing.
$headers        = [];
$headerCallback = function ($curl, $header_line) use (&$headers) {
    if (strpos($header_line, ":") === false) {
        return strlen($header_line);
    }
    list($key, $value) = explode(":", trim($header_line), 2);
    $headers[trim($key)] = trim($value);

    return strlen($header_line);
};

$absUrl = 'https://abs.url';
$curl = curl_init();

$opts[CURLOPT_URL]            = $absUrl;
$opts[CURLOPT_RETURNTRANSFER] = true;
$opts[CURLOPT_CONNECTTIMEOUT] = $this->connectTimeout;
$opts[CURLOPT_TIMEOUT]        = $this->timeout;
$opts[CURLOPT_HEADERFUNCTION] = $headerCallback;
curl_setopt_array($curl, $opts);
$rbody = curl_exec($curl);
$errno = curl_errno($curl);
if ($rbody === false) {
    $errno   = curl_errno($curl);
    $message = curl_error($curl);
    curl_close($curl);
    $this->handleCurlError($absUrl, $errno, $message);
}
$rcode = curl_getinfo($curl, CURLINFO_HTTP_CODE);
curl_close($curl);

echo "http code = ".$rcode."\n";
echo "http response = ".$rbody."\n";
package main

import (
	"fmt"
	"net/http"
	"time"
)

type conf struct {
	connectTimeout, timeout time.Duration
	returnTransfer          bool
}

func main() {
	absUrl := "https://abs.url"
	var cf = conf{10 * time.Second, 20 * time.Second, true}

	req, err := http.NewRequest(http.MethodGet, absUrl, nil)
	if err != nil {
		fmt.Printf("client: could not create request: %s\n", err)

		return
	}

	client := http.Client{
		Timeout: cf.timeout,
	}

	res, err := client.Do(req)
	if err != nil {
		fmt.Printf("client: error making http request: %s\n", err)
		handleError(err)

		return
	}

	fmt.Printf("http code = %d\n", res.StatusCode)
	fmt.Printf("http response = %s\n", res.Body)
}
Receiving callbacks and sending response messages
When processing the payment, the platform sends two kinds of callbacks to the web service: prescriptive and informational.
Prescriptive callbacks are triggered by the necessity of a certain action: for example, specific data has to be sent to the payment platform, the customer must be provided with specific information or redirected to third-party services, and so on. Such callbacks always contain intermediate information, and timely response to this category of callbacks is indispensable for payments to be processed correctly.
Informational callbacks allow you to receive payment status and other important information. This information can be used for timely updates of order statuses in your web service, providing information to your customers and other purposes according to the way your web service operates. These callbacks can contain intermediate or final payment information (for example, important events during payment processing or payment result information)., and this information can be used as required.
To receive callbacks (both prescriptive and informational),
- Specify the URL designated for receiving callbacks by the web service within the project. This can be done via Dashboard in the Projects section with the use of the Callbacks tab tools.
- Set up the integrity validation and parsing of the callbacks sent to the URL you have specified as it is crucial that callbacks with incorrect signatures are handled properly (i.e. rejected). You can use the code example presented below to set up.
- Set up sending synchronous HTTP responses with the information about the callbacks receipt:
200 OKif the signature is correct and400 Bad Requestif the signature is incorrect.
{
  "project_id": 200,
  "payment": {
    "id": "abc12345",
    "type": "purchase",
    "status": "success",
    "date": "2025-03-20T14:22:06+0000",
    "method": "Greek Banks",
    "sum": {
      "amount": 1000,
      "currency": "EUR"
    },
    "description": "Success"
  },
  "customer": {
    "id": "123"
  },
  "operation": {
    "id": 9529253065607,
    "type": "sale",
    "status": "success",
    "date": "2025-03-20T14:22:06+0000",
    "created_date": "2025-03-20T14:22:00+0000",
    "request_id": "f1de353331a01fd14163fe4226-00009530",
    "sum_initial": {
      "amount": 1000,
      "currency": "EUR"
    },
    "sum_converted": {
      "amount": 1000,
      "currency": "EUR"
    },
    "code": "0",
    "message": "Success",
    "provider": {
      "id": 1914,
      "payment_id": "",
      "auth_code": ""
    }
  },
  "signature": "OBjT3RaJnOWsDXOclvWoC6+CFSCtLprTo8VFbN6BYVQD2tVK/3d9k+RRA/7N9TV6OQqk+0uPUnx4/c8uaUurw=="
}
require_once __DIR__ . 'signature.php';

//@todo net set to merchant project https://api.merchant.com/callback.php

//@todo set projectId
$projectId = null;
//@todo set paymentId
$paymentId = '';
//@todo set secretKey
$secretKey = '';


$response = json_decode(file_get_contents('php://input'), true);

$rsignature = $response['signature'];

unset($response['signature']);


if ((new Signer($secretKey))->check($response, $rsignature)) {
    header('HTTP/1.1 200 OK');
    header('Status: 200 OK');
    echo "signature is correct\n";

    $projectId = $response['project_id'];
    $paymentId = $response['payment']['id'];

    //@todo save necessary info to merchant system
} else {
    header('Status: 400 Bad Request');
    header('HTTP/1.1 400 Bad Request');
    echo "signature is invalid\n";
}
package main

import (
	"encoding/json"
	"io/ioutil"
	"log"
	"net/http"
)

//@todo net set to merchant project https://api.merchant.com/callback.go

//@todo set project
type project struct{}

type request struct {
	Signature string `json:"signature"`
}

var prj project

//@todo set secretKey
var secretKey string

//@todo set paymentId
var paymentId string

//@todo get request
var r *http.Request

func main() {
	body, err := ioutil.ReadAll(r.Body)
	if err != nil {
		log.Printf("Error reading body: %v", err)
	}

	var req request

	err = json.Unmarshal(body, &req)
	if err != nil {
		log.Printf("Error parsing request: %v", err)
	}

	var w http.ResponseWriter

	if checkSignature(req, secretKey, req.Signature) {
		w.WriteHeader(http.StatusOK)
		w.Write([]byte("signature is correct\n"))
	} else {
		w.WriteHeader(http.StatusBadRequest)
		w.Write([]byte("signature is invalid\n"))
	}
}

func checkSignature(req request, secretKey string, signature interface{}) bool {
}
Responding to callbacks
General case
Responding to informational callbacks implies that you can configure collecting information from such callbacks for further use if required by the specifics of your web service operation.
Responding to prescriptive callbacks requires you to figure out how to perform actions that can be necessary for further payment processing.
That said, this step can be omitted now and performed later, after the initial setup and testing.
Prescriptive callbacks are typically triggered by the following events:
- Additional payment data is required: collect and send to the platform.
In these cases, the callback contains the
clarification_fieldsobject with the list of parameters required to be sent to the platform in the subsequent request. As a rule, the platform requests customer information: first and last name, date of birth, billing address, and so on.Figure 10. Example of callback data with the list of requested parameters { "clarification_fields": { "customer": { "type": "object", "description": "", "properties": { "psu_consent": { "type": "string", "description": "Need to request the customer's consent to make a payment" }, "psu_consent_text": { "type": "string", "description": "The text to be displayed on the payment form", "default": "The consent text to be displayed to the customer" } } } } }Collection of required information in such cases can be carried out in any convenient way, which includes using the existing database or prompting the customer to fill in the corresponding fields in the web service's interface. You can learn more about working with this type of callbacks in the section below once you have finished the initial setup and testing. It is also important to mention here that these cases are not rare and require timely response from the web service.
- Redirection of the customer to the external service is required.
In these cases, the callback contains the
redirectDataobject with the URL for redirecting the customer and with additional information. Responding to such callbacks requires you to redirect the customer to the provided URL. You can use HTML page code for this purpose.Figure 11. Example of callback data with the URL for redirecting the customer "redirect_data": { "method": "POST", "body": [], "encrypted": [], "url": "https://www.example.com/pay" }
Additional aspects
General monitoring of payment processing
After several test payments have been executed, you can explore how to monitor payment processing. YouTo monitor payment processing, you can use Dashboard—the user interface and Data API—the program interface. These interfaces allow you to access consolidated data about amounts, statuses, and other characteristics of the payments being processed, but there can be a delay of up to several minutes. To start monitoring, first, you have to obtain access to Dashboard, then set up permissions to access the test project, and, if you need to work with the Data API, generate an API token and the secret key. Once this is done, you can move on to working with payment information.
To monitor payment processing in Dashboard, use the Payments section (it contains information about all payment types) and the specialised sections with information about specific payment types as well as individual payment information tabs. To learn more about using these sections, go to Monitoring and performing payments
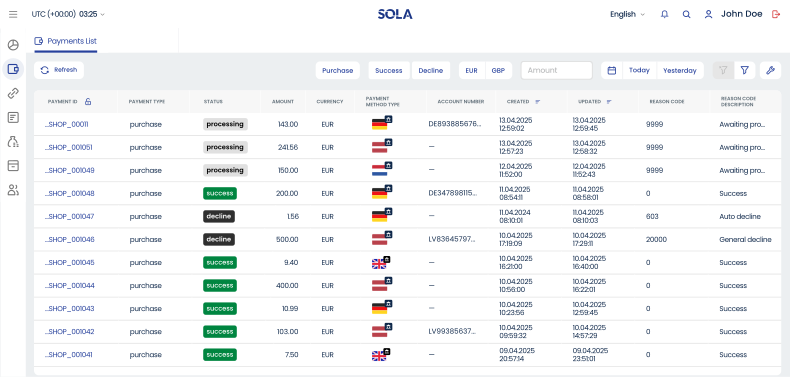
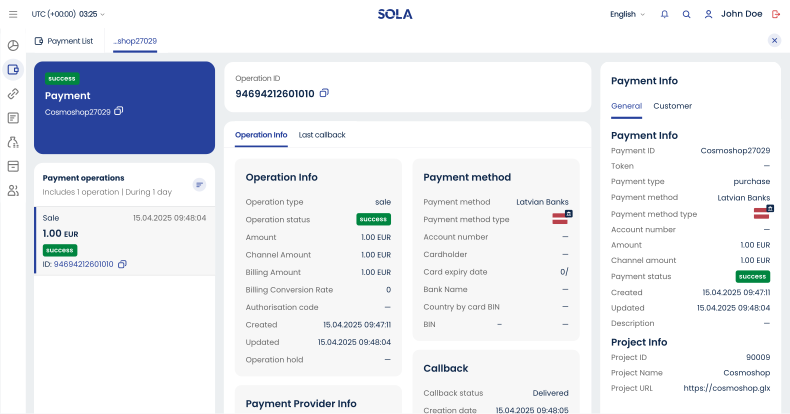
Data API contains endpoints you can send requests to in order to retrieve information about groups of payments or individual payments. You can learn more in this section of the documentation.
Checking current state of individual payments
To retrieve up-do-date information about the status of individual payments via the Gate API, send HTTP POST requests to the /v2/payment/status endpoint (with identifiers of the project and the payment you need) and receive synchronous HTTP responses with the requested data.
require_once __DIR__ . 'signature.php';

//@todo set projectId
$projectId = null;
//@todo set paymentId
$paymentId = '';
//@todo set secretKey
$secretKey = '';

$params = [
    'general'  => [
        'project_id' => $projectId,
        'payment_id' => $paymentId,
    ]
];

$absUrl = 'https://api.openpayze.com/v2/payment/status';

$params['general']['signature']  = (new Signer($secretKey))->sign($params);
$request                         = json_encode($params);

$curl = curl_init();
$opts = [];

$opts[CURLOPT_POST]       = 1;
$opts[CURLOPT_POSTFIELDS] = $request;
$opts[CURLOPT_HTTPHEADER] = ['Content-Type: application/json', 'Content-Length: '.strlen($request)];

$headers        = [];
$headerCallback = function ($curl, $header_line) use (&$headers) {
    if (strpos($header_line, ":") === false) {
        return strlen($header_line);
    }
    list($key, $value) = explode(":", trim($header_line), 2);
    $headers[trim($key)] = trim($value);

    return strlen($header_line);
};

$opts[CURLOPT_URL]            = $absUrl;
$opts[CURLOPT_RETURNTRANSFER] = true;
$opts[CURLOPT_CONNECTTIMEOUT] = $this->connectTimeout;
$opts[CURLOPT_TIMEOUT]        = $this->timeout;
$opts[CURLOPT_HEADERFUNCTION] = $headerCallback;
curl_setopt_array($curl, $opts);
$rbody = curl_exec($curl);
$errno = curl_errno($curl);
if ($rbody === false) {
    $errno   = curl_errno($curl);
    $message = curl_error($curl);
    curl_close($curl);
    $this->handleCurlError($absUrl, $errno, $message);
}
$rcode = curl_getinfo($curl, CURLINFO_HTTP_CODE);
curl_close($curl);

echo "http code = ".$rcode."\n";
echo "http response = ".$rbody."\n";

$response = json_decode($rbody, true);

$rsignrature = $response['signature'];

unset($response['signature']);

if ((new Signer($secretKey))->check($response, $rsignrature)) {
    echo "signature is correct\n";
} else {
    echo "signature is invalid\n";
}
package main

import (
	"bytes"
	"encoding/json"
	"fmt"
	"io"
	"log"
	"math/rand"
	"net/http"
	"os"
	"time"
)

//@todo net set to merchant project https://api.merchant.com/callback.go

type general struct{ project_id, payment_id, signature string }

type params struct{ gnrl general }

type response struct {
	Signature string `json:"signature"`
}

func main() {
	//@todo set project
	project := ""
       //@todo set secretKey
       var secretKey string
       //@todo set paymentId
       var paymentId string

	prms := params{
		gnrl: general{project_id: project, payment_id: paymentId, signature: ""},
	}

	signature := sign(prms, secretKey)
	prms.gnrl.signature = signature

	absUrl := "https://api.openpayze.com/v2/payment/status"
	reqBody, err := json.Marshal(prms)
	bodyReader := bytes.NewReader(reqBody)

	req, err := http.NewRequest(http.MethodPost, absUrl, bodyReader)
	req.Header.Set("Content-Type", "application/json")
	req.Header.Set("Content-Length", string(rune(bodyReader.Len())))

	res, err := http.DefaultClient.Do(req)
	if err != nil {
		fmt.Printf("client: error making http request: %s\n", err)
		handleError(err)
		os.Exit(1)
	}

	defer res.Body.Close()

	fmt.Printf("http code = %d\n", res.StatusCode)
	fmt.Printf("http response = %s\n", res.Body)

	var respBody response
	b, err := io.ReadAll(res.Body)

	err = json.Unmarshal(b, &respBody)
	if err != nil {
		log.Printf("Error parsing response: %v", err)
	}

	rsign := respBody.Signature

	if checkSignature(respBody, secretKey, rsign) {
		fmt.Printf("signature is correct\n")
	} else {
		fmt.Printf("signature is invalid\n")
	}
}

func sign(par params, secretKey string) string {
	//@todo implement sign function
}

func checkSignature(resp response, secretKey string, signature interface{}) bool {
	//@todo implement checkSignature function
}
If you have any questions about checking payment status information via Gate, go to the corresponding article.
Go to Checking current payment information to learn more.
Setting up processing of other payment types
Once you set up accepting card purchases, you can move on to other payment types and other payment methods. To learn how different payment types are processed in the payment platform, set up processing of payment types and payment methods, you need go to the section with the description of supported payment types and their possible statuses and the section with the description of alternative payments specifics.
Using auxiliary procedures and additional capabilities
Processing payments via Openpayze payment platform may involve various procedures and capabilities. Auxiliary procedures are required in certain cases, for example, when authentication of customers is needed. These procedures can be required for payment processing, which is why it is important that you know how to work with them. Additional capabilities, on the other hand, do not get in the way of payment processing and can be used if the merchant expresses the need for them; however, they do improve the quality of the provided service.
Once you have set up processing purchases, as described in this guide, it can be useful to set up performing procedures and capabilities that can be needed due to the specific characteristics of your web service and the payment methods used. These procedures and capabilities may include:
- Submission of additional payment information—to ensure timely submission of additional data that can be requested by payment systems.
- 3‑D Secure authentication—to provide customer authentication for processing card payments.
- Sending notifications to customers—to inform customers about payment processing results and other events via email.
You can also implement other procedures and capabilities described in Auxiliary procedures and Additional capabilities.
Launch
After implementing the basic functions, testing needed capabilities, and defining the user scenarios and workflows relevant for you, you can proceed to the launch of the production project. Make sure that by this time all organisational issues have been resolved. Then all you will have to do is to configure the project settings on the payment platform side and begin to use the identifier and the key of the production project.
Following the launch, you can continue your work on configuring various payment types, payment methods, and capabilities depending on the needs of your business. Please refer to our specialists with feedback and any other questions.
Good luck!